Introduction
Did you know that nearly 3 million Americans pick up woodworking every year? That’s huge—and it shows how popular this past time has become. Woodworking for beginners doesn’t have to be scary. All you need is a little encouragement to build that confidence.
For me, that came from my dad. One of my earliest woodworking memories was building a set of bookshelves with him for a church office. I was nervous as he showed me how to use a circular saw for the first time, but the thrill of making something with my own two hands took hold of me.
Woodworking for beginners doesn’t mean you need a full workshop or pricey gear. All you really need is a willingness to learn, some basic tools, and a little patience. This guide will walk you through everything: the tools, the wood, safety, simple projects, and how to set yourself up for success. Let’s dive in and get you building!
Why Start Woodworking as a Beginner?
I’ll be honest—when I first got curious about woodworking, it wasn’t because I thought I’d be building heirloom furniture or anything fancy. I just wanted a shelf that didn’t collapse under the weight of my books. And let me tell you, I have a lot of books! Those flimsy store-bought shelves made out of particle board weren’t gonna cut it.
One of the biggest reasons to start woodworking is the sense of accomplishment. There’s something magical about holding a piece of wood, measuring it, cutting it, and suddenly—boom—it’s a usable piece of furniture. Even if the corners don’t line up perfectly, you feel proud because you made it.
Another benefit of woodworking for beginners is stress relief. I didn’t expect this, but sanding a board or driving in screws is surprisingly therapeutic. There were days when life felt overwhelming, and spending an hour in the garage smoothing out cedar planks was the reset button I didn’t know I needed. Don’t believe me? You’ll see.
Of course, woodworking also builds practical, lifelong skills. Before I started, I couldn’t tell you the difference between hardwood and softwood. Now? I know pine is great for practice cuts, and poplar is a lifesaver when you want something inexpensive but a little sturdier.
And let’s not forget about the creativity. A few years back, my daughter was really into the surfing thing, so I made her a surf board coat hanger for her room. It was cool project. I got to release my inner artist and create something that she absolutely loved.
Here’s the kicker: you don’t need a huge budget or a professional workshop to get started. You can begin with a hand saw, a hammer, and a $10 tape measure. The important thing is just to start.
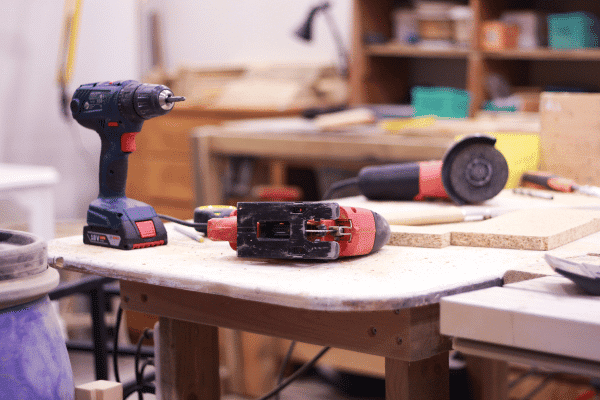
Essential Tools Every Beginner Woodworker Needs
When I first Googled “woodworking tools,” the list looked endless. Routers, planers, biscuit joiners, table saws, dust collectors, chisels… But truthfully, beginners don’t need all that. I learned the hard way by buying tools I rarely touched. If I could go back, I’d start with just the essentials.
Hand tools first. A hammer, a good measuring tape, a combination square, clamps, and a hand saw will take you further than you think. I still use that first $15 hand saw I bought, even though I’ve upgraded to power tools. It’s reliable and forces you to learn proper technique.
Power tools next. When you’re ready, get a drill/driver combo, an orbital sander, and a circular saw. These three alone can tackle 80% of woodworking for beginners. I still remember building my first cutting board with just those tools, and it came out decently.
Budget tips. Don’t be fooled into thinking woodworking has to be expensive. Borrow tools from friends or check local marketplaces. Facebook Marketplace, Craigslist or Harbor Freight Tools are good places to check for starter tools.
Maintenance matters. Keep blades sharp and tools clean. I ignored this at first, and dull blades chewed up my boards. A quick sharpening would have saved me hours of frustration.
So, if you’re standing in the tool aisle feeling overwhelmed, take a breath. Start small, buy quality basics, and build up slowly. Trust me, your wallet and your sanity will thank you.
Understanding Wood Types and Materials
I remember the first time I walked into a lumberyard. Not Home Depot or Lowe’s, but a lumberyard that sold all kinds of wood species, both hardwoods and softwoods. There were stacks of boards everywhere, labels I didn’t understand, and that smell of fresh-cut wood that was both intimidating and inviting.
Softwood vs hardwood. Softwoods like pine are cheaper, lighter, and easier to cut. Perfect for beginners. You pick these up at most of your corner box stores. It’s the stuff that most projects are built with.
Hardwoods like oak and maple are strong but tough to work with when you’re new. I learned this the hard way when I tried building a cutting board from oak—it was like sawing through concrete. But hardwoods are gonna last, and they don’t damage as easily.
Beginner-friendly woods. I can still hear my high school shop teacher say that pine, poplar, and cedar are your friends. They cut easily, sand smooth, and won’t break the bank. In one of those early shop projects, I built a corner shelving unit from poplar, and even though the joinery wasn’t perfect, the wood’s forgiving nature made it look charming rather than sloppy.
Buying lumber tips. Always check boards for warping. Lay it on a flat surface—if it rocks like a seesaw, skip it. You should expect to see a lot of these from your big box stores. Try to find boards with minimal knots and straight grain patterns. You’ll have to dig through the pile, but it’ll make for a better project.
Choosing the right wood makes or breaks your project. Don’t overthink it—start with pine, learn the feel of the grain, and work your way up.
Woodworking Safety Basics
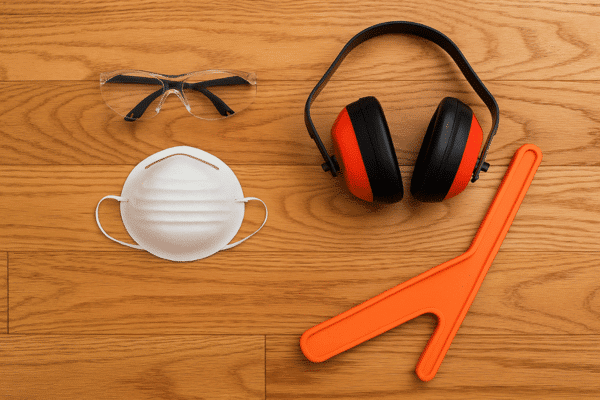
Let me be blunt: woodworking without safety is a disaster waiting to happen. I got cocky once and skipped safety glasses while ripping a board with a power saw. A splinter of dust hit my eye, and I spent the evening flushing it out. Lesson learned. Safety matters in woodworking.
Protective gear. Safety glasses, ear protection, and a dust mask are non-negotiable. Even a small project creates sawdust that you don’t want in your lungs. If you’re working with some plywoods, there are lots of chemicals added to the material. When you’re sanding, those chemical-laden dust particles are floating all around you. So please wear a dust mask. A respirator is even a better choice.
Safe handling. Keep both hands on tools when cutting, and never force the blade. I once forced a saw through a knot, and it kicked back so hard it scared me straight. There’s nothing quite like a wood bullet flying through your shop.
Workspace. Good lighting and a clutter-free area make a huge difference. Choose an area for your cutoffs while sawing and be diligent to use it. You don’t want to trip in a shop full of blades and chisels. Keep the floors clean.
Bottom line? Respect your tools. They’ll treat you well if you do.
Simple Woodworking Projects for Beginners
Your first projects should be about learning, not impressing. Let’s repeat that–your first projects should be learning, not impressing. It’s tempting to see woodworkers on social media craft these amazing builds and think, That’s what I’m gonna do. But give it time. You need to develop your skillset first, and the best way to do that is to start simple and progress to more complex projects.
Starter ideas:
- Birdhouse (teaches cutting and assembling basics)
- Picture frame (introduces miter cuts)
- Bookshelf (good for learning about weight support)
- Cutting board (practice sanding and finishing)
Each project teaches a skill you’ll use later. Don’t rush. The joy is in the process, not the perfection. Before you it, you’ll be building a farmhouse hall tree for your home.
Learning Woodworking Techniques
The saying “measure twice, cut once” sounds cliché, but there’s a reason for that. I was working with a guy once who was cutting pieces for me. I swear he cut every board an inch short. We had to stop and head to the lumberyard. That takes longer than double-checking that measurement.
Measuring and marking. Your measuring tape should have a bent metal tab on the end of the tape. This tab is designed to drop over the edge of a board so you can pull the tape and measure a longer dimension. That tab is going to be slightly loose so it’ll slide about a 1/8″. This design allows you to get an accurate measurement, whether you’re pulling from the edge of a board or pushing into an inside corner for a measurement.
When marking, use a sharp pencil or, even better, a marking knife. A marking knife is a razor-sharp tool that leaves just a slight line on your wood. It’s more accurate than a pencil line, and it provides a little indent that a chisel can drop into. This provides superior marking over a pencil line. Take your time when measuring and marking. Accuracy matters more than speed.
Cutting and sanding. When marking a cut line on a board, note which side of the cut is the cutoff piece. Your saw blade has a thickness to it, so you’ll want to make sure the blade is cutting the material away on the “cutoff side” of the line.
All wood has a grain to it. The grain of the wood will run in one general direction in a solid wood board (this isn’t the case for plywood, particle boards or wafer boards). You’ll want to sand with the grain, not against (or across) it.
Sanding across the grain will scar the wood, and if you intend to stain your project later, those sanding marks will show up. It’s disheartening to complete a build and then feel like it’s ruined during the finishing process.,
Joinery basics. Woodworking joinery is a rite of passage in this craft. There are butt joints, lap joints, castle joints, dove tails, splines, etc. In fact, Japanese joinery is an art all its own.
But when woodworking for beginners, we want to start simple and work our way up to the complex. So start with butt joints and screws, then move to pocket holes.
Glue is your friend—don’t skimp on it. It provides a truly strong joint if done properly.
Finishing. Wood finishing includes the coloring and sealing of a project. It’s one of the last things to do on a project, and if you haven’t cut corners, it can reveal a dynamic appearance.
Finishes can be paint, stain, clearcoat, or a combination of these. Staining can be tricky. Wipe excess off quickly, or you’ll end up with blotches. And as a general rule, you’ll want to stain a piece of wood close to it’s natural color.
One of my early projects was an aquarium stand that I built out of pine. Had I simply clear-coated it, it would’ve been beautiful. But I decided to stain it dark mahogany, and it ended up looking like it was zebra-striped. Another tough lesson.
Woodworking techniques aren’t about memorizing steps. They’re about practice. The more you mess up, the better you get.
Setting Up a Beginner Workshop
I used to think I needed a massive workshop like the pros on YouTube. Truth is, my first “shop” was out in the grass. I had to set up sawhorses every time I started a project.
Much later, I moved into a 2-bedroom apartment. One room was my bedroom; the other was my shop. It was challenging, but very doable. With a little forethought, you can set up shop just about anywhere.
Space. Whether it’s a garage, basement, or balcony, any dedicated corner will do. Just make sure it’s well-lit and ventilated.
Workbench. Build or buy a sturdy surface. One of my first projects was actually my workbench—it was crooked, but it held everything together. You just want to make sure your top is flat and has ample room for you to place your project.
Storage. Pegboards are cheap and keep tools in sight. Nothing kills momentum like spending 20 minutes looking for your hammer. Tool organization becomes more important as you begin to accumulate tools. You’ll want to think about this early on.
Don’t wait until you have the perfect setup. Start where you are, and your workshop will grow with you.
Free & Paid Resources to Learn Woodworking
The beauty of woodworking for beginners in 2025 is that help is everywhere. I started before online resources existed. I needed a mentor to show me what to do. But now, with YouTube videos, creators like Steve Ramsey make it easy to follow along and learn the essentials.
Free resources. YouTube channels, woodworking blogs, social media accounts, and forums are gold mines. You can find project guidance for every level. Find somebody teaching with your skillset and follow them.
Paid resources. Online courses and local community classes are worth it if you want structure. Taking a weekend class at a maker space can teach you more in two days than months of trial and error.
Never underestimate the woodworking community. People love sharing their craft, and they’ll save you from rookie mistakes.
Conclusion
Woodworking for beginners isn’t about perfection—it’s about learning, building, and finding joy in the process. Start small, stay safe, and take pride in every project, no matter how simple. The more you practice, the more confident you’ll feel, and soon you’ll be making projects you never imagined possible.
👉 So, what’s your first project going to be?
Frequently Asked Questions
What is the best way to start woodworking as a beginner?
The best way to start woodworking for beginners is to learn the basics: get a few essential hand tools, choose softwoods like pine, and start with simple projects such as a birdhouse or picture frame. Don’t invest in expensive equipment right away—focus on building confidence and skills first.
What tools should a beginner woodworker have?
Beginner woodworkers should start with a hammer, measuring tape, screwdrivers, clamps, and a hand saw. For power tools, a drill, circular saw, and orbital sander are great starter options. These tools cover most basic woodworking projects without overwhelming you.
What is the easiest woodworking project for beginners?
Some of the easiest woodworking projects for beginners include a wooden birdhouse, a cutting board, a picture frame, or a small bookshelf. These projects are simple, require minimal tools, and help you practice measuring, cutting, sanding, and finishing.
What kind of wood is best for beginners?
The best wood for beginners is softwood like pine, poplar, or cedar. These woods are inexpensive, easy to cut and sand, and widely available. Avoid hardwoods like oak or maple until you have more experience—they’re tougher to work with and more expensive.
How much does it cost to start woodworking as a beginner?
Starting woodworking for beginners can cost anywhere from $100 to $300, depending on the tools you buy. If you stick with hand tools and small projects, it’s very affordable. Over time, you can invest in power tools and expand your workshop as your skills grow.
Do I need a workshop to start woodworking?
No, you don’t need a full workshop to start woodworking. Many beginners work from their garage, basement, or even a balcony. A sturdy workbench, good lighting, and some storage space for tools are all you really need to get started.
Is woodworking safe for beginners?
Yes, woodworking is safe for beginners as long as you follow basic safety practices. Always wear safety glasses, use push sticks when cutting wood, and work in a clean, well-lit space. Never rush, and always keep your tools in good condition.