What is it and Why Build A Hall Tree?
When I first heard the term hall tree, I thought it was literally some kind of plant you stuck in your entryway. I laugh at myself now, but hey, we’ve all been there. A hall tree is basically a piece of entryway furniture that usually combines a coat rack, bench, and storage. If you’ve ever tripped over sneakers or had jackets piled on a chair, then you already know why one of these things can save your sanity.
If you’re still not convinced, think about this: a hall tree doesn’t just look nice, it changes daily routines. Shoes have a spot, backpacks have a hook, coats aren’t thrown across the couch. Maybe even your kids will automatically drop their stuff in the right place. That’s priceless.
Austin and Shelby Williams of central Kentucky (Go Wildcats!) knew they needed to clean up the clutter in their lives, so they decided they needed to build a hall tree. When they started researching hall trees, they soon discovered that buying one wasn’t cheap. Most of the nice ones ran $500–$1,200, and even then, most hall tree dimensions didn’t fit their space exactly. That’s when the idea for their DIY hall tree was born.

Now, why build a hall tree instead of buying? For one, you control the size. A hall tree for a big open farmhouse entryway is not gonna work in a narrow hallway of a small home. Second, you control the style. You want a rustic hall tree with distressed wood? Easy. Prefer a sleek, modern hall tree with a cushioned bench? Also doable. The best part is you end up with a DIY furniture build that actually looks like it belongs to your house, not like it came from a big-box catalog.
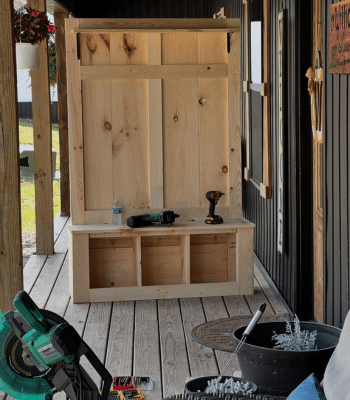
Another thing: building a hall tree can be surprisingly beginner-friendly if you keep the design simple. Austin started with a bench box made from 2 x 4s, added a vertical back panel, and screwed in some hooks he got from Lowe’s. Done. He even added cubbies for shoes and a little overhead shelf for hats. You can add accessories to your hall tree over time too, which is another advantage of DIY—you can customize and add as you go.
So yeah, a hall tree is more than a pretty piece of furniture. It’s a functional solution that can make your mornings less stressful. And if you build a hall tree yourself, you get the bonus of pride every time someone walks in and says, “Wow, where’d you get that?” and you can casually say, “Oh, I built it.” Trust me, that feels good.
Planning Your Hall Tree Project
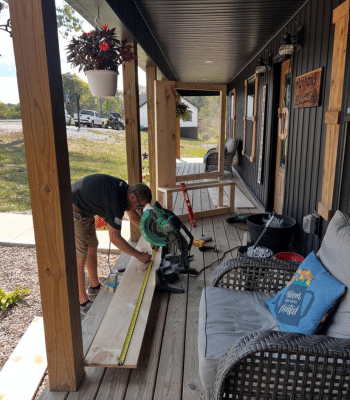
Now, the first mistake many new DIYs make is skipping the planning step. If you jump right into cutting wood without a plan, you’re gonna make that second (and maybe 3rd) trip to the lumber yard before you finish. Rookie move. So here’s my biggest advice: measure your space first—twice.
Think about where the hall tree will live. Is it in a mudroom? A narrow hallway? Maybe even inside a garage entry? Each space needs different dimensions. Austin’s ended up being about 72 inches tall and 24 inches deep, but he had plenty of room to work with in his open living space. You’ll need to consider what space you have.
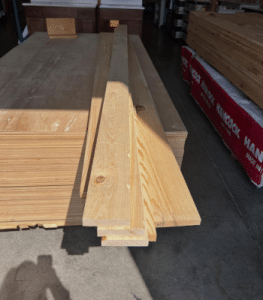
Another thing to consider is to pick a wood type that fits your budget and skill level. If you’re new to woodworking, pine is forgiving. It cuts clean, sands easily, and it’s strong enough to hold weight. If you’re more experienced and want something classy, hardwoods like oak or maple give a professional finish—but they’re pricey.
Budget matters too. Austin spent around $150 on materials (wood, screws, hooks, stain), which is way better than $900. But if you want extras like drawers, upholstered cushions, or fancier trim, your cost can climb. Still, you’re in control, which is the beauty of DIY furniture builds.
And here’s a small tip most people forget: plan for future use. Do you want baskets for shoes? Extra cubbies for kids? Maybe a spot for the dog leash? Sketch it out before you cut a single board. Trust me, it’ll save you from headaches later.
Tools and Materials You’ll Need
You don’t need a lot of tools to build a hall tree. You can do it with as little as a tape measure, a circular saw and a sander, but if you want mitered corners and decorative arches, you may need a miter saw and a jig saw.
Here’s the list I swear by now:
- Tools: circular saw (or table saw if you have one), power drill with bits, clamps, orbital sander, measuring tape, a square, and a level.
- Materials: ¾-inch plywood or solid wood boards, screws, wood glue, heavy-duty hooks, hinges (if adding doors), and maybe pocket-hole screws if you like clean joints.
- Extras: baskets for shoes, a cushion for the bench, paint or wood stain, polyurethane finish.
If you’re a newbie, don’t stress about fancy tools. You can rent bigger ones like a table saw from Home Depot or Lowe’s for a day. Also, always buy a little extra wood—mistakes happen, and it’s better to have a spare piece than drive back to the store mid-project.
Step-By-Step Instructions To Build A Hall Tree
This is where the fun starts, but also where mistakes can sneak in. I’ll walk you through the order Austin used to build his hall tree:
Cut the base and bench pieces:
Austin cut his 2 x 4s to frame up the bench and the vertical back panel frame. He used pocket holes for solid joints.
Assemble the base:
Check for square as you go. If it’s not square here, the whole hall tree will look crooked later.
Attach the back panel:
Austin used 1 x 10 pine boards to create a farmhouse design for his back panel. Make sure you measure your ceiling (and door) clearance before attaching, if you’re building outside.
Trim out the vertical panel boards:
The next step is to trim out the vertical boards with some 1 x 4s. Austin’s trim boards not only look great, but they also provide additional strength to the vertical boards.
Add hooks:
Austin used heavy-duty metal hooks, four across the back.
Paint or stain your hall tree:
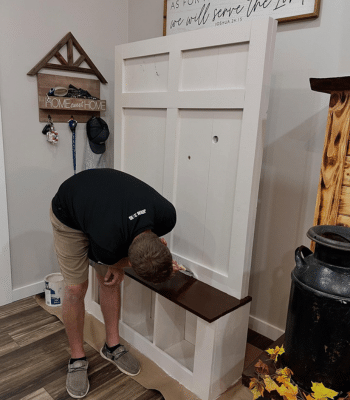
Austin’s project looks fantastic with a two-tone paint job. It matches his farmhouse aesthetic perfectly. Another possibility is to stain the wood or even just clear coat it for a natural wood look.
Optional shelves or cubbies:
If you want, add dividers under the bench for shoes, or an overhead shelf for hats. As you can see, Austin’s hall tree has multi-functionality with both of those options.
Take your time. Don’t rush your project. Sand between steps, check your measurements, and dry-fit pieces before screwing them in. It’s like cooking—prep matters.
Customization and Design Ideas
This is the fun part—making it yours.
You can add drawers to hide those unsightly items or to hold utility items like towels. This works great if your hall tree is in a mud room and you need to dry those kids off fresh from the pool.
You can make your hall tree fancy with crown molding and raised panels. You piece will not only be functional, but it’ll serve as a fine furniture piece.
You can use different types of hardwoods to create a beautiful centerpiece that sets the tone of a small room.
Reclaimed barn woods and metal pipe hooks are also a popular choice.
I’ve seen some hall trees with an inset mirror that gives that last opportunity for a once-over before leaving the house.
A couple of design ideas that work great:
- Farmhouse hall tree: distressed white paint, shiplap back panel, black metal hooks.
- Modern minimalist hall tree: smooth edges, solid stain, no trim. Simple, clean.
- Storage-focused hall tree: cubbies underneath for baskets, drawers for gloves, and a top shelf.
Safety Tips and Best Practices
I’ll be honest, I’ve had a few close calls in my woodworking history. Working fast or recklessly just isn’t worth the loss of a finger or an eye. Safety needs to be priority #1.
Always wear goggles or safety glasses, no matter how quick the cut. Wood chips in your eye are no joke. Gloves are great too, but don’t use bulky ones around spinning blades. And a dust mask? Non-negotiable. Sanding plywood dust is not something you want in your lungs.
Work in a ventilated space. If you can’t stain your piece outside, do the work in an open room and use a fan to blow the smell outdoors.
Maintenance and Care For Your Hall Tree
A hall tree takes a beating. Shoes scuff the bench, backpacks slam against the back, and hooks get tugged constantly. The trick is staying ahead of wear.
Every few months, wipe it down with a damp cloth and a little wood cleaner. For painted hall trees, touch up scratches as they happen. If you go with stained wood, a quick re-coat of polyurethane every couple of years keeps it fresh.
If the hooks loosen up, don’t just tighten them into the same hole—it’ll strip out. Instead, fill the hole with a little wood glue and a toothpick, let it dry, then re-screw. It’ll be stronger than before.
And don’t be afraid to evolve your hall tree. You can add baskets underneath, swap out hooks for sturdier ones, and even repaint when you redecorate the entryway. It’s not a museum piece—it’s furniture meant to serve you every day.
Conclusion
You can build a hall tree. It’s more than just a woodworking project—it’s a lifestyle upgrade. Your mornings can be smoother, your entryway cleaner, and honestly, think how you’ll feel every time a guest says, “Wow, you built that?” It’s functional, it’s personal, and it saves you a ton of money compared to buying.
So if you’re tired of tripping over shoes or digging through jacket piles, give it a try. Measure your space, grab your tools, and start small. You’ll make mistakes, sure—we all do—but in the end, you’ll have a hall tree that fits your home perfectly. And nothing beats the feeling of solving a daily problem with your own two hands.
Frequently Asked Questions:
How deep should a hall tree bench be?
A standard hall tree bench is usually 16–18 inches deep. This gives enough room to sit comfortably while keeping the piece compact enough for entryways.
Do I need advanced woodworking skills to build a hall tree?
Not at all. A hall tree can be as simple as a bench with a back panel and hooks. As long as you can measure, cut, and screw boards together, you can build one. More advanced features like drawers or cubbies just take extra time.
What tools are required to build a hall tree?
At minimum, you’ll need a saw (circular or table saw), drill, measuring tape, clamps, a sander, and a level. Optional tools like a pocket hole jig can make the project easier and cleaner.
Can I build a hall tree without a bench?
Yes. Some designs are just tall back panels with hooks and small shelves. However, including a bench adds both seating and shoe storage, which increases functionality.
How do I maintain a hall tree over time?
Wipe it down regularly with a damp cloth. For painted hall trees, touch up chips as needed. For stained wood, reapply polyurethane every couple of years. Tighten hooks and screws when they loosen.